

How To Extend Blink Camera Range
How to Accommodate Blink XT2 and XT Camera Settings
To admission the settings for a detail photographic camera, tap the settings slider icon![]() located to a higher place the right peak corner of each thumbnail image on the Dwelling screen.
located to a higher place the right peak corner of each thumbnail image on the Dwelling screen.
| Glimmer XT/XT2 settings: |
| |
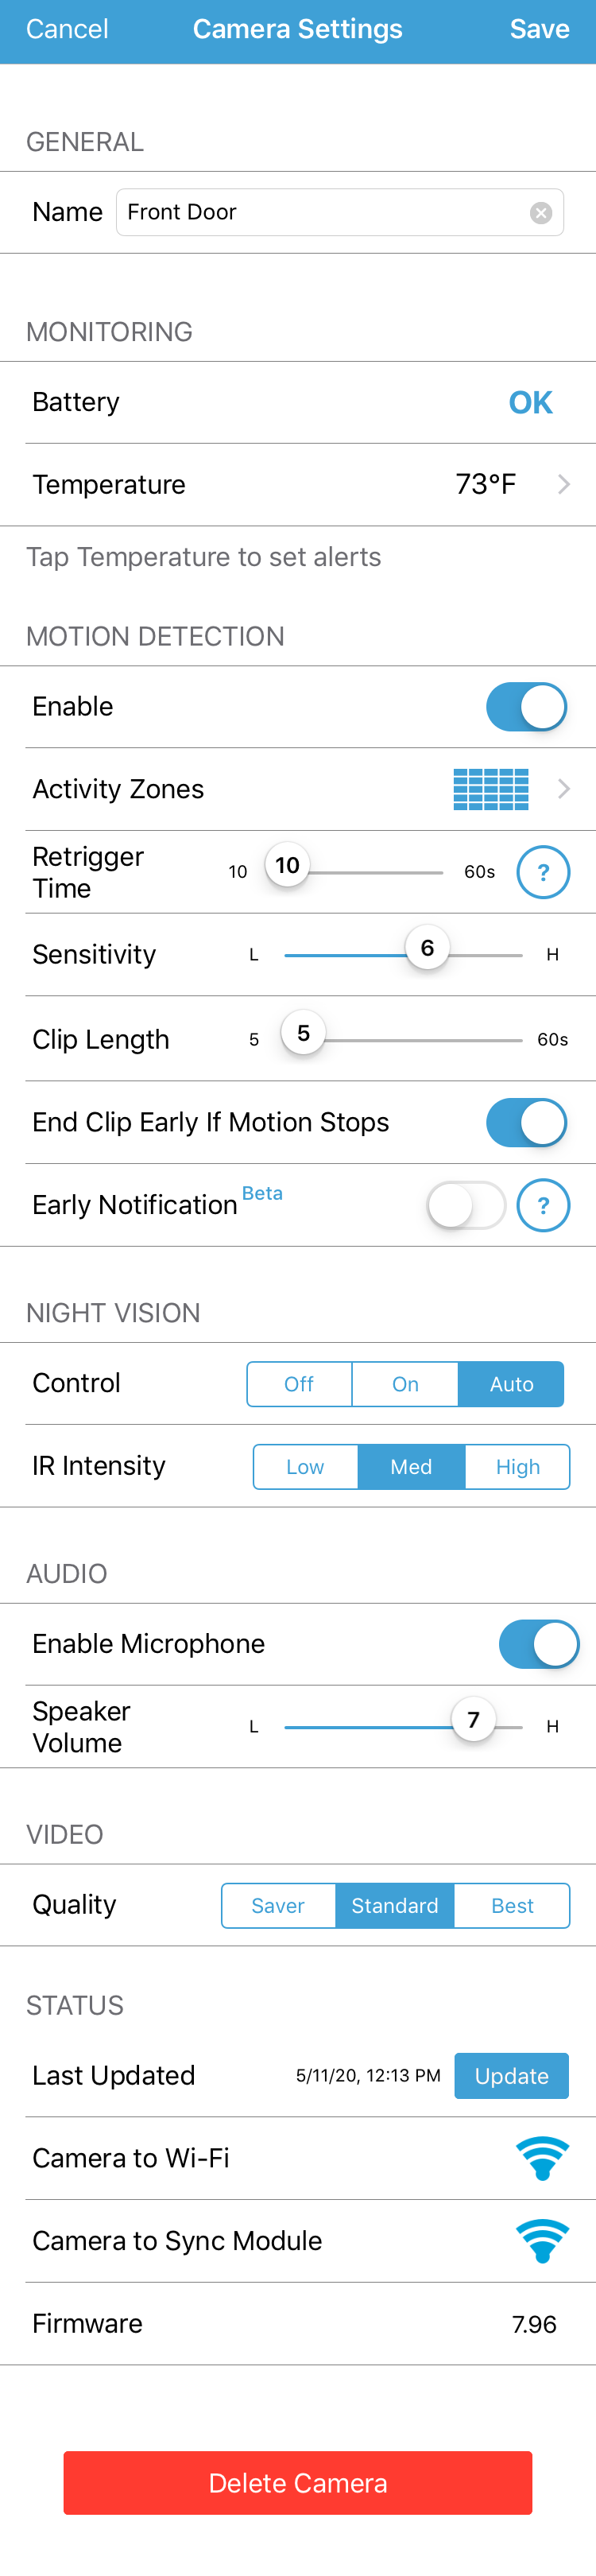
General:
Proper name:Camera name that volition be displayed on your Domicile screen. You can edit this proper noun at any fourth dimension from here or at the Abode screen.
Monitoring:
Battery:This volition tell you if your battery is OK or if it needs to be replaced. Note: This does not appear in the Mini settings since it just runs on Air conditioning power.
Temperature:The current temperature of that camera. Tap on the temperature to enable temperature alerts or to calibrate the thermometer.
Movement Detection:
Enable:This setting includes the photographic camera when arming the system it is connected to. If enabled, ![]() the photographic camera will detect movement when armed, if disabled,
the photographic camera will detect movement when armed, if disabled, ![]() it volition not detect move when the system is armed.
it volition not detect move when the system is armed.
Activity Zones: Disables motion detection for selected regions of the camera view to prevent unwanted movement clips or alerts.
Retrigger time: The length of time from the completion of one motion clip to the start of another. This can be set up from x-60 seconds.
Sensitivity: Controls motion sensor sensitivity.
Low sensitivity detects larger objects in motion. High sensitivity detects smaller objects. Adjust sensitivity then test by creating motion alerts to attain the right remainder for your needs.
Clip length: The length of motility clips to be recorded; this can be set between 5 and 60 seconds for Indoor (gen 1) , XT and XT2 cameras. The maximum clip length for Blink Mini is 30 seconds.
End clip early if movement stops: If the camera stops detecting motion, the clip volition finish before the full clip length is reached.
Early Notification Beta : This option sends the alert as before long equally movement is detected and before the prune is consummate. In the Blink App, tap the alert notification to be immediately taken to the Live View of that camera.
Video Recording: When this setting is off, the Mini photographic camera will only ship motion notifications without recording clips; all the same, Live View is still available.
Dark Vision:
Two controls adjust the light source for viewing in the dark.
Control: If gear up to Off, the illuminator will non plough on. If set to On, the illuminator will ever turn on. If set to Auto, the illuminator will simply turn on in low light weather condition. Blink Mini tin can be set to On or Auto just.
Intensity:This value controls brightness of the IR illuminator. This value can be gear up to Low, Medium, or High. Adjust to control glare or show more than item.
Sound:
Enable Microphone: If enabled, audio volition be captured in the Live View and motility clips. If disabled, audio will not be captured.
Speaker Volume:A slider sets the speaker audio level on the photographic camera. This is just available on XT2 and Mini cameras.
Video:
Quality: This allows you to alter the video quality of your Blink camera. More data about the different modes tin can be found hither.
Status
Status LED:On a Mini camera yous can fix when the LED light displays On, Off or Recording.
Last Updated: This button manually updates your photographic camera status.
Photographic camera to Wi-Fi & Camera to Sync Module: This section shows the Point Strength from the last time the camera connected. Subsequently moving your photographic camera it is a skillful idea to return here and ensure you lot have a good signal strengths.
Firmware:Displays your current firmware version.
Delete Camera:This push button removes the camera from your Blink system, it will no longer appear on the home screen.
Source: https://support.blinkforhome.com/using-the-blink-app/how-to-adjust-camera-settings
Posted by: moorerthund1988.blogspot.com
0 Response to "How To Extend Blink Camera Range"
Post a Comment